
Flow design: flow section
A strong first impression matters — and the Flow section is where you shape your widget’s overall structure and style. Here’s how to customize it to fit your brand and keep visitors engaged.
Access the Flow section
Go to Flow Settings → Layout → Flow in the left-hand menu.
This opens the Flow section, where you’ll see two main tabs: Standard and Customize.

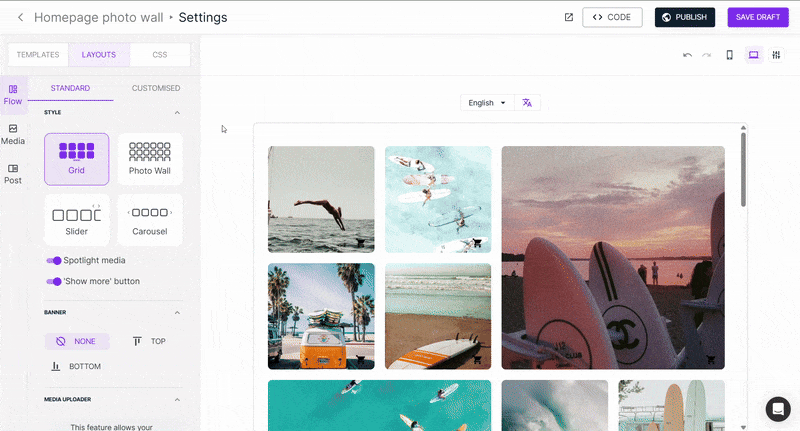
Style
In the Standard tab, you can choose your widget’s main layout:
- Grid: classic square layout
- Photo wall: flexible image wall
- Slider: side-to-side navigation
- Carousel: continuous, looping content
Depending on your layout, you can also choose how new posts load and if the central post should be highlighted:
- Show more button or infinite scroll (for Grid / Photo wall)
- Arrows and/or auto-play (for Slider / Carousel)
- Spotlight media (for all)
Switch to the Customize tab for advanced options — such as the font, background color, number of columns and/or rows shown on desktop or mobile, arrows style, padding, and more.
Banner
You can choose whether to display a banner — and where it appears in your Flow.
After enabling it on the Standard tab, go to Customize to adjust:
- Text size and color
- Background styling
- Banner alignment
To edit the banner text - title and subtitle - click the language icon.
You can also preview how your banner looks in different languages using the language dropdown.
Learn more about translations here.
Enable CTA Button
The CTA Button allows you to add an interactive button to your Flow, enabling visitors to either submit their own content or apply to become influencers.
You can enable it from the Standard tab in the Flow settings and choose its position (top or bottom).
Once enabled, select the desired action from the dropdown:
- Media Uploader – lets visitors submit their own content directly through your Flow
- Recruit Influencers – redirects users to your Dreaminfluence recruitment page
Media Uploader settings
If you select Media Uploader, a Manage uploader button will appear at the bottom of the page. Use it to configure:
- Input fields
- Collection flow
- Direct upload link
In the Customize tab, you can style the CTA button by adjusting its position, text color, and background color.
Note: The Media Uploader is a paid feature. Contact your Customer Success Manager (CSM) for more information or check out this article.
Recruit Influencers
If you select Recruit Influencers, users will be redirected to your Dreaminfluence recruitment page, where they can apply to join your influencer team.
This is a great way to let creators proactively reach out to your brand and grow your influencer community.
Learn more about how to invite and recruit influencers in this article
Influencer Marketing (Dreaminfluence) is a paid add-on. To enable this feature or learn more, please contact your Customer Success Manager (CSM).
Ready for the next chapter of designing your flow? Learn how to:
- Customize all media in your flows.
- Design a post pop up window.
- Filter and sort content in your flow.
- Embed your flow in your website.